How to Label Text Classification Training Data -- With AI

That's right! It is possible to label text classification training data without a human annotator using a method I proposed last month. Then, you can use the labelled data to train a supervised model. So, what came first, "the chicken or the egg" or similarly "the AI labelled training data or the supervised model." But there's a solution to this riddle – and that is zero-shot models.
Zero-shot text classification models require two inputs: text and a set of labels. Then, they output a score for each one of the labels. Thus, they can classify text into arbitrary categories without any fine-tuning. Currently, there are large zero-shot text classification Transformer models that are available on Hugging Face's model distribution network that can be implemented with just a few lines of code.
In this article, I will start by giving a brief overview of the system from a high level and the outcomes of the experiments I performed to demonstrate its capabilities. I've published a full article that covers these two aspects in more depth that you can find on my website or published in Towards Data Science. Then, I will move onto discussing how to implement this system with Python code by reproducing the main experiment described in my previous article.
Process
The overall system is quite simple. The input to the system is unlabelled text data and a list of labels. Then, the output is a small supervised model that classifies text into the given labels. The key component within the process is a large zero-shot text classification model. This model takes in text segments from the unlabelled dataset and outputs a score for each of the labels. The label with the highest score is assigned to the segment. Finally, the newly labelled cases are used to fine-tune a small supervised model.

Summary of Experiments
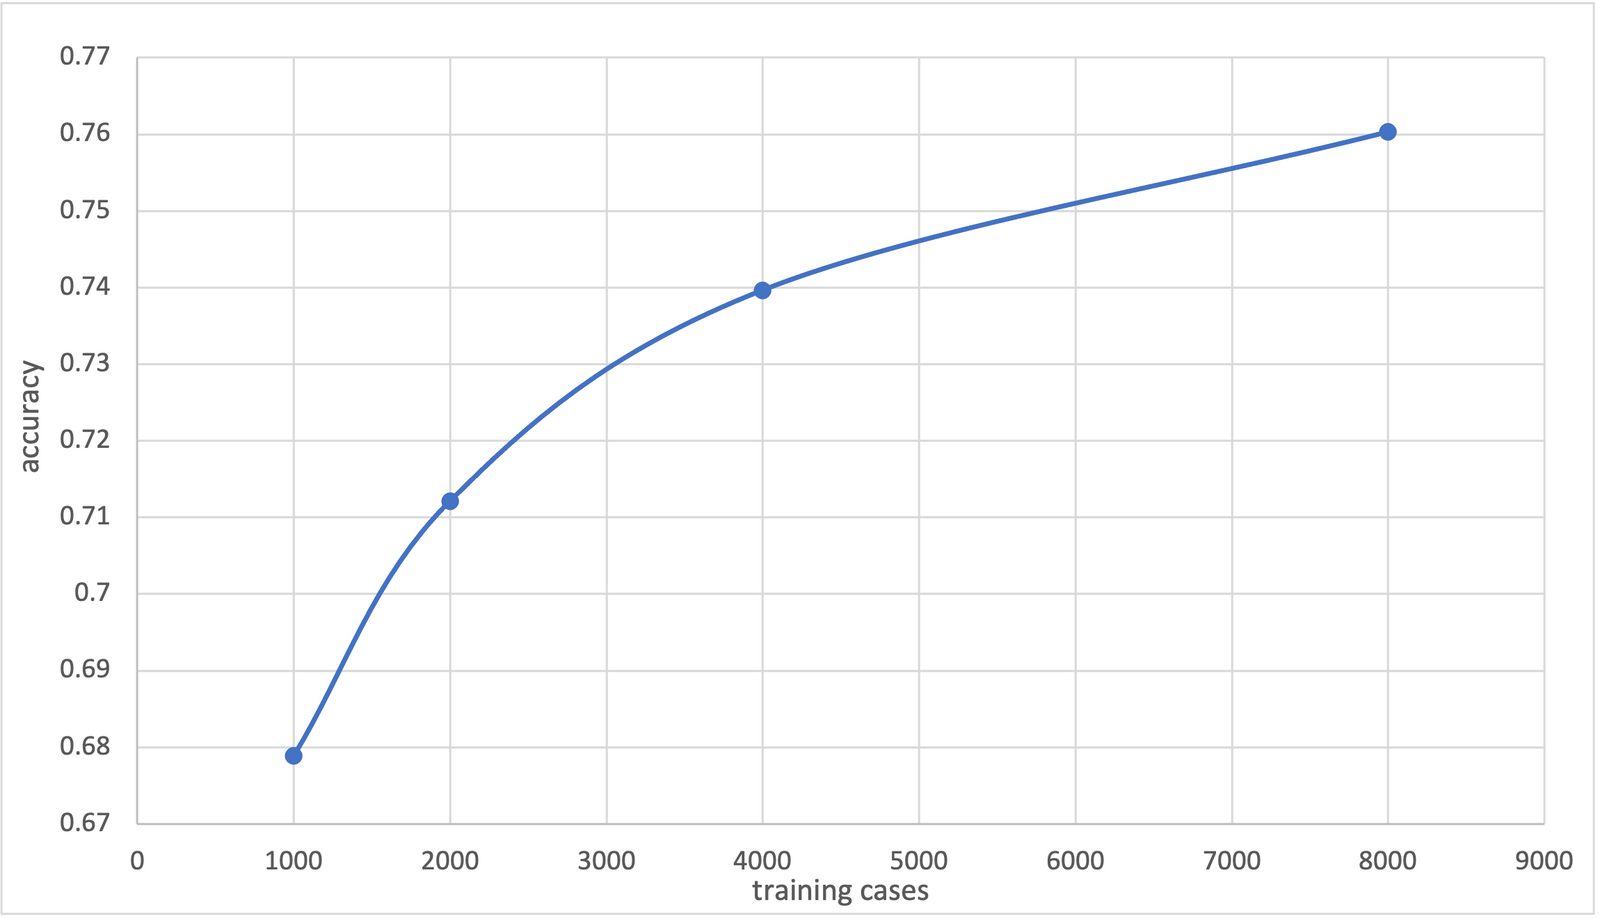
The main experiment I performed showed promising results. First off, I used a binary text classification dataset called the Stanford Sentiment Treebank V2 (SST2). Then, a zero-shot text classification model called “facebook/bart-large-mnli” was used to label the various amounts of training cases, which has an accuracy of 88.19% on the evaluation cases. Next, the newly labelled training cases were used to fine-tune a Naive Bayes text classification model. Below is the Naive Bayes model's accuracy on SST2's evaluation dataset. After 8000 training examples, it achieved an accuracy of 76.03%.
In the end, the Naive Bayes model achieved an accuracy that was approxmently the same as the most popular zero-shot text classification Transformer model that's available on Hugging Face's model distribution network called “typeform/distilbert-base-uncased-mnli.” But of course, the Naive Bayes model would only require a small fraction of the required resources to run compared to a Transformer model.
Significance
The experiments showed that it is possible to train a small supervised text classification model without labelled data. So, by using this method, training data can be labelled without human annotators. Then, the labelled training data can be used to fine-tune a smaller model that could be more easily used in production. This opens doors for using supervised models that couldn't be trained in the past due to a lack of labelled training data.
Implementation
Download Zero-Shot Model
First off, we're going to use Hugging Face's Transformers library to load a zero-shot text classification Transformer model. Let's get right to installing it.
pip install transformersThen, we'll import and create a pipeline object for our desired model. In this case, we'll be performing a task called "zero-task-classification" and we'll use a model called "facebook/bart-large-mnl." I've also included code to automatically detect and use an available GPU.
from transformers import pipeline
import torch

device = torch.cuda.current_device() if torch.cuda.is_available() else -1
task = "zero-shot-classification"
zero_shot_model = "facebook/bart-large-mnli"
zero_shot_classifier = pipeline(task, zero_shot_model, device=device)
Make Predictions
I'll briefly discuss how to make predictions using the zero-shot model. For these examples, we'll predict the sentiment of movie reviews I created myself. First, we need to define what labels we'll use. So, we'll set the labels to"positive" and "negative." And remember, no fine-tuning is required before our model can begin making predictions.
labels = ["positive", "negative"]

positive_text = "Wow I loved that movie so much!"
We can now provide both the labels and the text to the classifier to produce a prediction.
positive_prediction = zero_shot_classifier(positive_text, labels)
print(positive_prediction)
Result: {'sequence': 'Wow I loved that movie so much!', 'labels': ['positive', 'negative'], 'scores': [0.9640112519264221, 0.03598877415060997]}
The output is a dictionary with three keys: sequence, labels and scores. The sequence key contains the text from the input. The label key contains the labels in order of their score. And finally, the scores key contains the scores from highest to lowest, where the sum of all of the scores equals 1.
We can isolate the top label as shown below.
positive_result = positive_prediction["labels"][0]
print(positive_result)
Result: positive
Data
Let's discuss how to collect data we can then label and use to train a small supervised model. For simplicity, we'll use SST2 – the same dataset used for the experiments described in my past article. This dataset is available on Hugging Face's dataset distribution network and contains movie reviews that are labelled as being either "positive" or "negative."
We'll start off by installing Hugging Face's datasets library.
pip install datasetsNow, we'll import a function called "load_dataset." Which, as the name suggests, allows us to fetch a dataset from Hugging Face's Network. It requires three inputs, the name of the dataset, the data instance and the split. Here, the dataset is a subset of a larger dataset called "glue." So, the first and second parameters for the load_dataset function are "glue" and "sst2" respectively. Then, for the split parameter, we'll indicate if we wish to download the training or validation data along with the number of instances.
from datasets import load_dataset

# Loading 8000 training cases
train_data = load_dataset('glue', 'sst2', split="train[:8000]")

# Loading all 872 validation cases
eval_data = load_dataset('glue', 'sst2', split="validation[:]")
Let’s explore the data. Both of the train_data and eval_data objects are of type “Dataset” which is an iterable where each case contains a dictionary. The dictionary contains three keys: sentence, label and idx. The sentence key contains the text for the specific case. Then, the label key indicates if the case is “positive” or “negative,” where the integer “1” indicates that that the case is positive while “0” indicates the case is negative. Finally, each contains its own unique integer value under the idx key.
for i in range(0, 2):
  print(eval_data[i])
  print(eval_data[i]["label"])
  print("-------------")
Result:
{'sentence': "it 's a charming and often affecting journey . ", 'label': 1, 'idx': 0}
1
-------------
{'sentence': 'unflinchingly bleak and desperate ', 'label': 0, 'idx': 1}
0
-------------
Label and Format the Data
We can produce our own labels for the training data without the need of a human annotator using a zero-shot model. The code below iterates over the training cases, and for each case, it uses the zero-shot model to produce a prediction. The results are saved into a list of tuples, where the first index of each tuple contains the text data for the case and the second index contains the label in the form of a string. This format matches the required format for the TextBlob Naive Bayes Classifier we will soon be training.
train_cases =[]
labels = ["positive", "negative"]
for case in train_data:
  result = zero_shot_classifier(case['sentence'], labels)
  label = result["labels"][0]
  result = (case['sentence'], label)
  train_cases.append(result)
I suggest you use a Python package called tqdm to add a progress bar to the loop. You can accomplish this with only small modifications to the code above.
pip install tqdmfrom tqdm import tqdm
train_cases =[]
labels = ["positive", "negative"]
for case in tqdm(train_data):
result = zero_shot_classifier(case['sentence'], labels)
label = result["labels"][0]
result = (case['sentence'], label)
train_cases.append(result)And that's it, we just used an AI model to label our data! The zero-shot model we used has an accuracy of 88.19% on the evaluating data for the same dataset, so although not perfect, this training can still be used to train a supervised model.
Let's convert the evaluating data into the proper format. We'll use the actual labels as that would give us a better indication of the final model's accuracy.
eval_cases = []
for case in tqdm(eval_data):
  label = "positive" if case["label"] else "negative"
  result = (case['sentence'], label)
  eval_cases.append(result)
Train a Naive Bayes Classifier
Let's now create a Naive Bayes classifier using TextBlob. This classifier uses "traditional" NLP technologies and relies on probability to make predictions. It requires significantly less resources than deep learning approaches like Transformer models. We can easily create a Naive Bayes classifier using a Python package called TextBlob. TextBlob is built on top of the famous Python package called NLTK to make it easier to use and is quite popular with over 7000 stars on GitHub and over 10M downloads.
pip install textblobWe can now import a class called NaiveBayesClassifier from the textblob package as shown below.
from textblob.classifiers import NaiveBayesClassifierBut, before we start training the classifier, we need to download a tokenizer called "punkt" from NLTK. Remember, TextBlob is built on top of NLTK, so sometimes, we must download specific resources from NLTK when using TextBlob. Also, when TextBlob is installed, NLTK is also installed, so there's no need to pip install NLTK. Let's import NLTK and download punkt.
import nltk

nltk.download('punkt')
From here, we can create and train a classifier with just one line of code as shown below.
classifier = NaiveBayesClassifier(training_cases)And that's it! we have now successfully trained a Naive Bayes Classifier without any prior labelled data!
Evaluate
We can now evaluate the model with one line of code as shown below to determine its accuracy on the evaluation set.
accuracy = classifier.accuracy(eval_cases)
print(accuracy)
Result: 0.7603211009174312
And there we go, our model has an accuracy of 76%!
Classify
Let's discuss how to use the Naive Bayes classifier to make predictions. The code below retrieves the top label for any arbitrary text.
prob_dist = classifier.prob_classify("I loved this movie")
print(prob_dist.max())
Result: positive
We can also get the score of any label. The score is between 0 and 1 where 1 has high certainty and 0 has low certainty. The sum of all of the scores adds up to 1.
print(prob_dist.prob("positive"))Result: 0.9079443066804341
Conclusion
I hope you go onto use this proposed method for your future applications. By using this proposed method, you can bypass using human annotators to label your data – which would save you time and potentially money.
Helpful Links:
Previous article that focuses more the process, experiments and next steps.
Subscribe to my YouTube channel for upcoming content on the process described in this article.
Colab: contains the code used in this article.